Showing posts with label Recipes. Show all posts

Thursday, 18 June 2020

Bon Appétit Recipe Test : Miso Almond-Butter Cookies


I first saw this recipe during the 'pantry dessert' episode where the BA food editors make a dessert from their home pantry with whatever they had with them at the time. Chris Morocco made miso almond-butter cookies and at the time, it didn't really sound appealing.


At Ezel's urging to try the recipe and as I looked around my own pantry, I had just enough miso paste and just enough peanut butter to make these cookies so what the heck, let's do it. 


Almond butter is expensive here and I had peanut butter so why waste? And Ezel had coconut sugar so I used that instead of dark brown sugar. Coconut sugar is also brown okay. My peanut butter was a chunky no sugar, no salt pure peanut butter so I had to blitz it with my hand blender to make it a little smoother. There were tiny bits of peanuts in the end product - extra texture!


Again, there's nothing to exotic about the ingredients and method (just the out of place miso paste). I got lazy to brown the butter in the stove so I used the microwave oven! I heated it in 30 seconds to 1 minute intervals and I probably got up to the 4th minute when brown bits started appearing in at the bottom of the bowl. The butter smelled so good after it browned, just like freshly popped butter popcorn!


You would think that the miso flavor would be noticeable in the cookie but it really wasn't. While it baked, all I could smell was peanut butter and when it was done baking, it tasted like a savory peanut butter cookie. A slight tinge of umami but no strong miso flavors. It was really good! I forgot to sprinkle on the sea salt after it came out of the oven but the miso paste already has salt in it so it was salty enough for me.

The chocolate dip option didn't harden at room temperature (well, the chocolate isn't tempered) so I'd suggest taking the chocolate chip route instead. The chocolate does bring a different depth of flavor to the cookie especially if you use a bittersweet chocolate so I highly recommend this step.
Do try this recipe (here at bonappetit.com) if you're a nut butter fan and wouldn't mind some savory flavor in your sweets. 


So good was the recipe that I had to attempt it a second time, this time with actual almond butter and with chocolate chips in the cookies itself (yes, no chocolate hardening problems!).


To take it one step further, Ezel made almond butter from scratch using the food processor. It took a long while for the butter to form, about 20 minutes and the color is much lighter than usual nut butter because it was raw nut butter. The brown butter got a bit browner this time so there was a bit of a bitter aftertaste that didn't come from the dark chocolate chips.


I bought an almond butter jar just to test what it tasted like and it was like concentrated toasted almonds. The cookies had about a tablespoon of the unsweetened commercial almond butter but overall, there wasn't much of a nutty flavor because we used a different miso paste this time.


The Koji miso was much more intense in flavor than the previous white miso so the flavor became more pronounced in the cookie, also making the cookie saltier than before. Because there wasn't an intense peanut flavor, this batch had a more salted brown butter and fermented beans flavor. It was not bad but I would've liked a stronger nut flavor.


Unlike the first attempt, the cookies turned out much crunchier and after leaving it out to cool, mostly hardened leaving a slight bit of softness right in the middle. The recipe is so much better as a crunchy cookie compared to the softer ones from before.


It was an interesting experience to get such varying results and I wouldn't mind making this again with a few tweaks of my own. Add toasted peanuts? Perhaps some rolled oats? Or perhaps both? Either way it sounds like a delicious combo!

Thursday, 28 May 2020

Bon Appétit Recipe Test : Cinnamon Oat Peach Crisp

I admit for this recipe, I was trying to use up a can of peaches I've had for a while. Fresh peaches are expensive in our tropical country that doesn't produce them and it's not readily available like other imported fruit.


I've also wanted to try making a cobbler for a while so this was the perfect opportunity of killing 2 birds with 1 stone. This recipe is featured on the Bon Appétit website but isn't actually a BA test kitchen product. It's by B's Cracklin' BBQ, a barbecue joint in Savannah, Georgia but hey, if it's good enough to be featured, I'm willing to try it.


I halved the recipe as I had more or less a kg of peaches (actually less haha) and half the recipe called for a kg of peaches. It's a straightforward recipe with simple ingredients but because my butter was too cold, I ended up using two forks to slowly mash the butter into the dry mix till there weren't any dry bits left.


It still turned out delicious. The topping was crisp, sweet and buttery. Because I didn't have a lot of peaches, the bottom layer and the topping layer turned out pretty even in size. More crisp to savour! I served it with a little whipped cream so the dairy component was still there. In my opinion, vanilla ice cream would've made it a tad too sweet. If you like nuts, I'd suggest adding toasted almonds or hazelnuts for an additional crunch.

Get the recipe here at bonappetit.com. Enjoy!

Wednesday, 20 May 2020

Bon Appétit Recipe Test : Basque Burnt Cheesecake

The Basque Burnt Cheesecake craze is still alive and well in Malaysia and every other cafe or bakery has their own version of the rich, cheesy, crust-less, burnt-top cheesecake. Each slice is not cheap and I've seen some places charge up to RM20 a slice which could mean two meals for some. I had to try making it to see why they were charging so much for it.

My first attempt was in a air fryer which has its limitation in terms of size but the results were satisfactory. Mildly burnt all over. Eggy when eaten fresh, cheesier and richer chilled. I still had to try making it in a proper oven since I have access to one now.

Right out of the oven vs sitting at room temperature

Room temperature cake vs chilled cake

The recipe on Bon Appétit is by Molly Baz and is available here. The ingredients are straight-forward but a little difficult to get during the MCO, it was always the cream cheese or whipped cream missing from the shelves. I got my hands on a litre of Anchor whipping cream while a colleague of mine managed to get a kilo of Anchor cream cheese. Hey, maybe using slightly higher quality ingredients will result in a better cake?

I couldn't get my hands on a 10" springform pan (another baking item that's difficult to get!) so I made do by bending a rectangle aluminium foil tray to a sort of square shape, whatever works I guess. And as per Molly's video, there was a satisfying jiggle when it came outta the oven.


Boing boing boing!


The cheesecake come out really tall and pretty then sank in the middle as it cooled, detaching the burnt top in the process.


The cake was beautifully burnt all round, on all sides and despite its wonky shape, the brown all over was very satisfying.


Mmm... more toasty goodness. The high temperature really did a good job.

The cheesecake was sufficiently burnt and very creamy at room temperature. It was nowhere as eggy as the air fryer version but did sweat into the parchment paper as it was cooling. I like it chilled as it has that creamy ice-cream like texture. Bear in mind, this is a very, very rich cake. Just a small slice fills you up easily and is probably a dinner ruin-er if eaten at tea time.

I'm still not sure why it costs so much out there with its common ingredients and fool-proof recipe. I do know that I will make this again and you should try it too!

Sunday, 17 May 2020

Bon Appétit Recipe Test : Shockingly Easy No-Knead Focaccia

With the MCO in effect in Malaysia, there hasn't been much work in the office which has left me with time to experiment with recipes from my latest obsession - food Youtube channel/page, Bon Appétit. The BA test kitchen is delightful to watch especially the Gourmet Makes series by Claire Saffitz and the Reverse Engineering series by Chris Morocco. 

The channel (which started off as a magazine decades ago) is definitely not for the short attention span (unlike the videos from Buzzfeed's Tasty) and everything made in their test kitchen requires patience and determination with recipes that are not quite the simplest. The food editors however are an amazing bunch of people who are so knowledgeable about food, it's really amazing to watch. I may be late to the BA craze but I guess it's never too late to start. 

I have never made bread before but the words 'shockingly easy' and 'no-knead' definitely caught my eye to try making it at least once. The recipe is available here and is by Sarah Jampel. 


Ingredients were simple and instructions were easy especially with that step-by-step video to guide you. I did make this rather in a hurry so the first proof was 3 hours followed by a 1 1/2 hour proof in the baking pan. I like bread with a pillowy soft middle like most Asians do so I didn't want to use the oven baking pan (which was about 18 x 13") with the fear of it coming out thin and biscuit-like.


This baking dish is 9x9" so I did end up with a pretty tall and poofy bread. It's probably a bit taller than I expected but it had a nice crunchy crust and a soft pillowy center. I was pretty happy!


Watch that bounce!

One thing to note is that focaccia is generally a rich and fragrant bread from all the extra virgin olive oil in it. It's not very neutral in flavor so it's good even on its own. With the minimum proofing time I chose to go with, it tasted a bit yeasty but within bearable levels for me. The amount of oil in it may be a concern for some though.


I made a tuna melt the following day - tuna mayo + cheddar toasted in the oven. The bottom of the focaccia turned out nicely toasted and crunchy. This was a really rich sandwich.

For the rest of the focaccia, I plan to toast them in the air fryer as tasty croutons or cut them into bread sticks to dip into some leftover tomato sauce. It soaks up liquid really nicely but holds it pretty well.

This was pretty fun for a first timer baking bread. Do give the recipe a go if you have time to leave a doughy baby laying around for a few hours. The results should be even better compared to mine!

Friday, 20 May 2016

Pasta in Pumpkin & Salted Egg Yolk Sauce with Asparagus & Chorizo ~ Deliciouslogy Cooks!

Here's some background on why this recipe came about. I had something similar at a cafe here but it wasn't great. So when my mum bought a pumpkin and made a puree, I took advantage of it to make some salted egg yolk pumpkin pasta. I believe that this dish is what they meant to serve me that day.


If you're a fan of salted egg yolk, this recipe is a must-try. If you're not into pumpkin, no worries, the flavor is really mild here. You get the creamy texture from the salted egg yolk though it's not as salty as you'd think it would be. It could be quite healthy too - substitute the chorizo with fresh meat and make sure you use real pumpkin puree. 

Wednesday, 27 April 2016

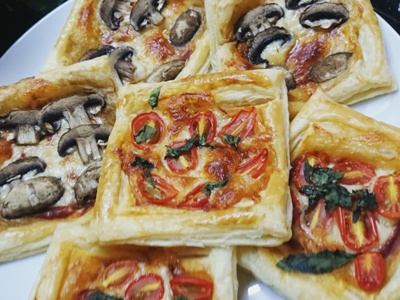
Puff Pastry Pizza ~ Deliciouslogy Cooks!

Ever thought of how puffy, buttery and flaky pastries are made? It starts with puff pastry dough, a multi-layered pastry dough with fat (usually butter) tucked in every layer. Making puff pastry dough from scratch is no easy task so I decided to start off my puff pastry pizza with frozen puff pastry, readily available at supermarkets.

Monday, 29 June 2015

Homemade Kimbap with Gochujang Pork ~ Deliciouslogy Cooks!


After I came back from Korea, I missed the local food so much that I made kimbap every week, 3 weeks in a row. Partially, it was because I had bought gochujang from my trip to Korea and found danmuji at Isetan in KLCC. With a bamboo sushi rolling mat ready at home, I was ready to embark on a kimbap rolling adventure!

Whenever I ate kimbap in Korea, it always had danmuji, the Korean pickled radish so I believe that it's the one ingredient that makes kimbap authentic along with a splash of sesame oil brushed on the seaweed. I always seem to forget the sesame oil brushing step.

Friday, 12 June 2015

Homemade Pizza ~ Deliciouslogy Cooks!


I have always wanted to make pizzas at home - real pizzas, not those on a tortilla or on bread but with real crust, real toppings and real cheese baked to perfection.
And one day, I finally did!


My sauce base was tomato for all 3 pizzas, made of sauteed onions and garlic, browned and thoroughly cooked. Then, tomato puree is poured in and brought to a simmer and then topped off with dried mixed herbs and seasoned with salt and pepper.


What you get is a tasty tomato base that will not overpower your toppings. I mixed in BBQ sauce for the BBQ chicken pizza to give the pizza a slight smokey flavor. Variations for the sauce can include hot sauce for a kick or some thai spices to make it Asian. The combinations are endless.


The ingredients I used are easily attainable here: crabsticks, deli ham, canned pineapples, a roast chicken leg shredded and tossed in BBQ sauce, fresh button mushrooms, green capsicum and tuna (with a dash of lemon juice and pineapple syrup to kill the fishiness and some mayo for creaminess)


The task of preparing the pizza dough was left to my brother and he no longer remembers who's recipe he used but a quick check online reveals very similar recipes and methods by Bobby FlayMartha Stewart and Jamie Oliver.


The dough is then left to rest in a cool and dark area then till it expands about an extra 1/4-1/3 of it's original size.


Some poking to make sure the dough doesn't rise further.

DSC 1357

The dough is then rolled out to a circle (attempted circle)


And holes are poked in it to make sure it cooks through.


The tomato base is then applied before the ingredients.


This is an All-In pizza. We threw in almost every ingredient in here beginning with the big and flat ingredients right at the bottom followed by everything else and finishing it off with cheese.


I used a mixture of mozarella and Bega's Extra Tasty Cheese. Like its' namesake, it is a flavorful cheese which melts beautifully on pizza. At RM13 for a 250g block, it's worth the money and tastes better than any pre-shredded cheese that gets soggy and loses flavor quickly.


Out of fear that the crust would not cook, the pizza was left in the oven for too long. The tomato base was dried around the edges and the pizza crust became a biscuit-like texture. The dull texture in the photo is pretty evident of an overcooked pizza. It should only sit in the oven till the cheese melts and browns a little, 10 minutes max.


The BBQ chicken pizza has shredded chicken sitting on the sauce and topped with capsicum and mushrooms.


This one turned out to have a biscuit-y texture as well. We only realized the error when eating the first 2 pizzas while the 3rd was still cooking in the oven.


The Seafood (more like Mock Seafood) of tuna, crabsticks and pineapple turned out the most perfectly cooked.


The cheese had only browned along the edges and the crust still had a spongey bread like texture.


Overall it was a delicious experience and the cost of 1 & 1/2 ala-carte large Pizza Hut/Dominos Pizza is enough to cover the 3 pizzas made at home.


Now to learn how to make and cook the crust to perfection (and yes, learn to shape it into a nice circle), vary the toppings and make it even more satisfying overall.


But really now, who can resist cheese that melts like that even if it's doesn't look perfect?